Japan has a wide variety of arts and crafts, most of which date back centuries ago and greatly contribute to the country’s culture. In terms of paper crafts, origami is probably the most popular art form often associated with Japan.
The word origami is often used in modern times to refer to all kinds of paper folding techniques. However, origami actually has several other sub-types that make use of distinct techniques. One of the origami types that has gradually gained popularity over the years is kirigami or the art of paper cutting.
History and Definition of Kirigami Art
The term kirigami comes from the words “kiru” and “kami” which respectively mean “to cut” and “paper”. The art form is believed to have been developed decades, or even centuries, before the 17th century as a means to create various offerings, pleasing to the gods.
Come the 17th century, kirigami had already gained recognition as a form of art in different countries spread across Asia. Japan and China actively practiced the art, creating various designs that served as representations for elegance, wealth, grace, perfection, and the relationship of man and the universe.
Kirigami only reached the United States during the 1960s through a book titled “Kirigami, the Creative Art of Papercutting” that was written by Florence Temko. This book, which was published in 1962, served as the very first guide that exposed the United States to the Japanese craft.
The craft was well-received and appreciated by Western countries and even intertwined with their own traditions or cultures. In the United States, for example, the concepts and designs of kirigami were used to create moveable parts for puppet theater.
The Japanese art of paper cutting was also combined with that of Germany known as Scherenschnitte to create stunning works of art which consisted of paper silhouettes.
At present, kirigami is actually quite prominent in many items that may not be instantly associated with traditional Japanese art. Some examples that make use of kirigami include handmade greeting cards, pop-up books, scrapbooks, home décor projects, and handmade gift wraps.
Furthermore, a lot of kirigami lessons are actually taught in many elementary schools, in and out of Japan. Making paper snowflakes and paper doll chains are among the most popular tasks given to students to help develop their scissor skills, fine motor skills, visual motor skills, and planning abilities. Both of these activities, along with many other paper crafts, are actually based on kirigami’s importance of symmetry.
Kirigami vs Origami

It is perfectly understandable that a lot of people get confused when it comes to kirigami and origami. Both art forms make use of fine paper and various folding techniques to produce wonderful three-dimensional creations.
However, kirigami separates itself from origami by allowing the crafter to make use of cutting techniques, as well. Furthermore, taping and gluing are also allowed when it comes to kirigami.
Origami mainly makes use of folding techniques and creates a challenge for the crafter to go from one step to the next. Kirigami is equally challenging in terms of cutting accuracy and its relatively complicated designs.
Basic Tools, Techniques, and Tips For Making Kirigami

There are a lot of guides and books available in the market that discuss the many tools, techniques, and tips that should be considered when practicing the art of kirigami. Some of the most basic ones that a beginner should have and understand include:
Tools
Similar to origami, kirigami does not require a lot of tools. Some of the basic items that a crafter will need to make kirigami art include a cutting mat, a pair of scissors or a craft knife, a steel ruler, and, of course, paper.
Techniques and Tips
The actual techniques used in kirigami are basically similar to that of other paper cutting crafts. To create kirigami art in the most hassle-free way possible, it is best to approach designs by following the ideal flow of kirigami techniques below:
-
Scoring
Scoring the areas of the paper that need to be folded should be the first step when creating kirigami art. Doing so will allow the crafter to have an easier time making neat folds throughout the project. If the paper is initially cut before scoring, the risk of tearing it increases, especially when it comes to smaller and more delicate sections.
A small nail, awl, bone folder, ballpoint pen (without ink), or any pointed item may be used for the scoring process. The paper should be placed on a smooth, flat surface that should quite hard to prevent making incredibly deep grooves.
Regardless of how the paper will be folded in the next steps, the same scoring technique can be used all throughout. The edge of a ruler can be used as a guide when scoring straight lines.
-
Cutting
After scoring the paper, it can then be cut according to the kirigami design or template at hand. A pair of regular scissors may be used for this process but craft knives may be a bit easier in terms of creating accurate and sharp cuts. All cuts located within the inner portion of the main silhouette or outline should be prioritized.
When using a craft knife, the paper should be placed on an adequately sized cutting mat for precision and to avoid ruining one’s table. Similar to scoring, a ruler may be used as a guide to make straight cuts. For curved cuts, it is recommended that the paper be rotated towards the opposite direction the craft knife is moving to.
It is important to note that craft knives are extremely sharp. One’s hands should always be kept away from the blade’s path. For young crafters, adult supervision should be present and precise or complicated cuts should be assisted or done by the adult.
After all interior cuts have been done, the main outline of the kirigami design or template can then be cut. For small, complicated cuts that extend outside the template’s silhouette and toward the interior, rough cuts should initially be made using scissors. Afterward, a craft knife can be used to precisely remove the excess paper starting from the innermost side to the outermost side.
-
Folding
Folding is the third step in making kirigami art. The two most common types of folds used in kirigami projects are the mountain fold and valley fold. The mountain fold requires that the paper be folded down and away from the template’s guidelines, while the valley fold requires the paper to be folded up and towards the guidelines.
For curved lines, it is best to make use of one’s thumb and index finger to squeeze and pinch along the sides of the guidelines.
Kirigami Instructions & Tutorials – Basic Pop-up Card, Butterfly Pattern, Flower Pattern, and More
Some basic patterns and designs that children and adults can use to begin their journey into the world of kirigami include:
Pop-up Card (Heart)
Handwritten letters are incredibly thoughtful but may not be as effective when a standard, mass-produced birthday or Christmas card is used. Creating a personalized or custom card is worth considering and is undeniably a fun activity. A simple kirigami pop-up heart card can be done through the following steps:
-
Prepare two sheets of paper, one colored and the other white.
-
The white paper will serve as the actual card. After folding this piece of paper in half, cut out a heart shape along its folded side, making sure to leave a small portion of the heart uncut.
-
Slightly open the card and push in the heart such that its initial mountain fold in the center turns into a valley fold.
-
Complete the pop-up card by gluing the colored piece of paper to the back of the white paper.
Butterfly Pattern

Making butterflies out of paper is quite challenging especially when using origami techniques. As previously mentioned, symmetry is an important part of kirigami and is one of the many things that make it more attractive to crafters than origami. Complicated designs can be simplified through this technique known as one-fold kirigami. As such, a kirigami butterfly can be created in just several minutes through the following steps:
-
Prepare a rectangular or square piece of paper.
-
Fold the paper in half.
-
Draw half of a butterfly design on the folded paper, using the folded edge as the vertical center of the pattern.
-
Cut out the butterfly pattern, making sure to keep the paper neatly folded all throughout the process.
-
Unfold the paper.
Flower Pattern
For designs that feature repeated patterns such as flowers, a similar concept to that used in making a kirigami butterfly can be used. Flower petals also follow a sense of symmetry, using the center point as an axis. As such, a simple kirigami flower can be created through just six steps:
-
Prepare a rectangular or square piece of paper.
-
Fold the paper in half, making sure to bring the bottom section up towards the upper section.
-
Fold it again in half, making sure to bring the right side over and towards the left side.
-
Fold the paper for a third time, making sure to bring the left side over and towards the right side. The end result should be a triangular shape.
-
Cut the paper into the desired flower petal shape. For a simple flower, the two top corners of the triangular folded paper can just be rounded to create a conical shape.
-
Unfold the paper.
Spider Web
Making a kirigami spider web is pretty similar to creating a paper snowflake. Countless variations of the spider web can be made, of which the easiest kind follows the steps below:
-
Prepare a rectangular piece of paper.
-
Fold the paper in half.
-
Create a small crease in the middle by folding it again in half in such a way that the right side goes over and towards the left side.
-
Bring the bottom right corner up towards the topmost side and create a 60-degree angle at the small crease. Fold it in place.
-
Bring the bottom left corner up towards the topmost side of the paper and over the folded bottom right corner. It should be folded in such a way that it does not go beyond the right edge of the paper.
-
Cut away the top portions of the folded piece of paper to form a triangular shape.
-
Cut out horizontal slots across the triangle, making sure to leave a vertical piece of paper in the center intact to prevent the paper from falling apart.
-
Unfold the paper.
Online Kirigami Tutorials and Templates
It can be quite confusing to practice the art of kirigami without visual aids, as shown by the solely written instructions discussed above. Fortunately, kirigami crafters, regardless of whether they are at beginner, intermediate, or advanced levels, can find plenty of free templates and tutorial videos online. These can be used for practice or as a basis for their own design.
Some site worth checking out include:
-
The Easy Cut Pop-Up Patterns and Templates at Moddi Day People Brands – Perennial Moments (http://www.moddidaypeople.com/)
-
The Kirigami Diagrams at Origami-Art.us (http://origami-art.us/)
-
The Kirigami for Kids at Origami Resource Center (http://www.origami-resource-center.com/)
-
The Kirigami Patterns at Origami-Instructions.com (http://www.origami-instructions.com/)
-
The 3D Kirigami Cards at Wonderful DIY (http://wonderfuldiy.com/)
-
The 3D Kirigami Greeting Cards at iCreativeIdeas.com (http://www.icreativeideas.com/)
Kirigami and Responsive Architecture
In recent years, science and technology have been making great advances by incorporating various concepts used in art and design. Kirigami is among the many art forms that offer a lot of promising possibilities to the world of innovation, particularly in terms of responsive architecture.
An architect from Ithaca, New York named Jenny Sabin discussed her newest venture in architectural design that focuses on looking at various assemblies capable of adapting and responding to environmental conditions. She notes that kirigami offers plenty of powerful geometric formulas that may lead to the completion of this momentous idea.
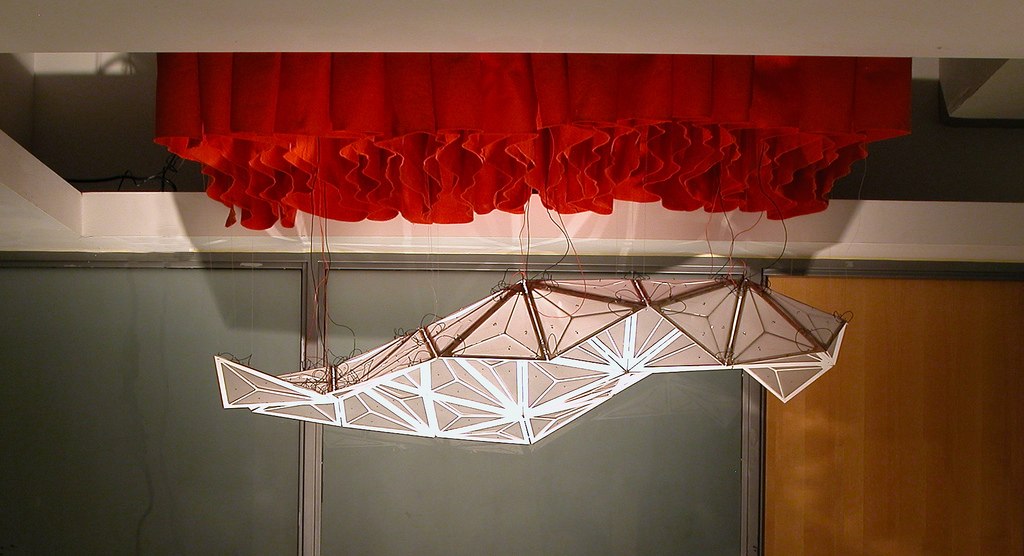
One of Sabin’s recent projects that she and her Cornell University team did was the Colorfolds. This spectacular, shape-shifting structure was inspired by the movement and connection of human cells. The installation was made using kirigami techniques and resulted in a massive piece of art. With the use of sensors, the project exhibited movements similar to relaxing and contracting muscles.
According to Sabin, kirigami-inspired research offers limitless possibilities, given the seemingly countless variations, designs, and patterns continuously being developed as time goes by.